
| 일 | 월 | 화 | 수 | 목 | 금 | 토 |
|---|---|---|---|---|---|---|
| 1 | 2 | 3 | 4 | 5 | ||
| 6 | 7 | 8 | 9 | 10 | 11 | 12 |
| 13 | 14 | 15 | 16 | 17 | 18 | 19 |
| 20 | 21 | 22 | 23 | 24 | 25 | 26 |
| 27 | 28 | 29 | 30 |
- unstack
- namedtuple
- Python 특징
- 딥러닝
- Python
- 정규분포 MLE
- VSCode
- 카테고리분포 MLE
- BOXPLOT
- 최대가능도 추정법
- type hints
- Numpy data I/O
- python 문법
- groupby
- ndarray
- Array operations
- Numpy
- Operation function
- pivot table
- dtype
- boolean & fancy index
- 가능도
- seaborn
- Python 유래
- scatter
- 부스트캠프 AI테크
- Comparisons
- subplot
- 표집분포
- linalg
- Today
- Total
또르르's 개발 Story
[38-3] Pruning using PyTorch 본문
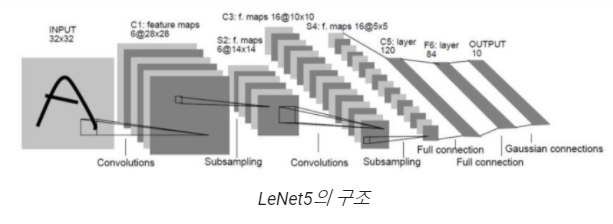
Pruning을 수행하기 위한 간단한 모델을 생성하고 훈련합니다.
모델은 LeNet5, 데이터는 Mnist를 사용합니다.
자세한 내용은 Pytorch pruning tutorial를 참고해주세요.
Pruning Tutorial — PyTorch Tutorials 1.8.0 documentation
Note Click here to download the full example code Pruning Tutorial Author: Michela Paganini State-of-the-art deep learning techniques rely on over-parametrized models that are hard to deploy. On the contrary, biological neural networks are known to use eff
pytorch.org
1️⃣ layer weight 확인
생성된 모델의 첫 번째 레이어를 구성하는 parameter들은 다음과 같습니다.
첫 번째 weight와 bias로 구성됩니다.
module = model.conv1

print(list(module.named_parameters())) # will not change even after pruning

print(module.weight) # now it is the same as module.named_parameters()
[('weight', Parameter containing:
tensor([[[[ 0.1672, -0.1517, -0.1711],
[ 0.1280, -0.1407, 0.3215],
[-0.1074, 0.2512, 0.2103]]],
[[[ 0.0602, 0.2026, 0.0181],
[ 0.1411, 0.0426, 0.1177],
[-0.0267, 0.1855, 0.0767]]],
[[[ 0.3355, 0.0562, -0.5521],
[-0.1873, 0.0618, -0.2184],
[-0.0807, 0.2019, 0.4228]]],
[[[ 0.3663, -0.0216, 0.2986],
[ 0.1475, 0.4550, 0.3350],
[-0.6378, -0.6662, -0.2658]]],
[[[ 0.2871, 0.1041, 0.2666],
[ 0.0158, 0.4709, -0.2112],
[ 0.4000, 0.0856, -0.3989]]],
[[[ 0.4908, 0.0509, 0.2348],
[-0.3349, -0.2446, -0.7014],
[-0.6735, -0.3921, -0.2518]]]], requires_grad=True)), ('bias', Parameter containing:
tensor([ 0.1874, 0.0468, 0.0102, -0.1306, 0.2191, 0.4025],
requires_grad=True))]
Parameter containing:
tensor([[[[ 0.1672, -0.1517, -0.1711],
[ 0.1280, -0.1407, 0.3215],
[-0.1074, 0.2512, 0.2103]]],
[[[ 0.0602, 0.2026, 0.0181],
[ 0.1411, 0.0426, 0.1177],
[-0.0267, 0.1855, 0.0767]]],
[[[ 0.3355, 0.0562, -0.5521],
[-0.1873, 0.0618, -0.2184],
[-0.0807, 0.2019, 0.4228]]],
[[[ 0.3663, -0.0216, 0.2986],
[ 0.1475, 0.4550, 0.3350],
[-0.6378, -0.6662, -0.2658]]],
[[[ 0.2871, 0.1041, 0.2666],
[ 0.0158, 0.4709, -0.2112],
[ 0.4000, 0.0856, -0.3989]]],
[[[ 0.4908, 0.0509, 0.2348],
[-0.3349, -0.2446, -0.7014],
[-0.6735, -0.3921, -0.2518]]]], requires_grad=True)module ( model의 첫 번째 layer)의 named_buffer는 비어있는 것을 알 수 있습니다.
pruning 후에 named_buffer에 값이 채워질 것입니다.
# Check named_buffer is empty

print(list(module.named_buffers()))  # now the buffer is empty. It will show up after being pruned.
original output은 다음과 같습니다.
output_orig = model(images[:1])


>>> print(f"original output: {output_orig}")

original output: tensor([[ -7.9678, -13.6928, -20.6445,  -5.8569, -13.8743,  22.2749,  -2.0126,
         -13.3453,  -4.1711,  -4.2301]], grad_fn=<AddmmBackward>)
2️⃣ Random Unstructured Pruning => Weight
Pytorch에서는 여러 가지 prune method를 제공합니다.
여기서는 random으로 선택하는 방식을 적용해서 weight를 pruning 합니다.
torch의 prune module을 불러옵니다.
import torch.nn.utils.prune as prune
Random으로 Unstructured Pruning을 수행하기 위해 prune.random_unstructured을 불러옵니다.
이때, 첫 번째 layer (module)에만 적용하고, amount=0.3 비율로 수행합니다.
prune.random_unstructured(module, name="weight", amount=0.3)
named_parameters()를 찍어보면 weight -> weight_orig으로 이름이 바뀐 것을 알 수 있습니다.
>>> print(list(module.named_parameters()))[('bias', Parameter containing:
tensor([ 0.1874, 0.0468, 0.0102, -0.1306, 0.2191, 0.4025],
requires_grad=True)), ('weight_orig', Parameter containing:
tensor([[[[ 0.1672, -0.1517, -0.1711],
[ 0.1280, -0.1407, 0.3215],
[-0.1074, 0.2512, 0.2103]]],
[[[ 0.0602, 0.2026, 0.0181],
[ 0.1411, 0.0426, 0.1177],
[-0.0267, 0.1855, 0.0767]]],
[[[ 0.3355, 0.0562, -0.5521],
[-0.1873, 0.0618, -0.2184],
[-0.0807, 0.2019, 0.4228]]],
[[[ 0.3663, -0.0216, 0.2986],
[ 0.1475, 0.4550, 0.3350],
[-0.6378, -0.6662, -0.2658]]],
[[[ 0.2871, 0.1041, 0.2666],
[ 0.0158, 0.4709, -0.2112],
[ 0.4000, 0.0856, -0.3989]]],
[[[ 0.4908, 0.0509, 0.2348],
[-0.3349, -0.2446, -0.7014],
[-0.6735, -0.3921, -0.2518]]]], requires_grad=True))]
그리고 아까 아무 값도 없던 named_buffers에서는 값이 들어가 있는 것을 확인할 수 있습니다.
>>> print(list(module.named_buffers()))[('weight_mask', tensor([[[[0., 1., 0.],
[0., 0., 1.],
[0., 1., 1.]]],
[[[1., 1., 1.],
[1., 0., 1.],
[1., 0., 0.]]],
[[[0., 1., 0.],
[1., 0., 1.],
[1., 1., 1.]]],
[[[1., 1., 1.],
[0., 1., 1.],
[1., 1., 0.]]],
[[[1., 1., 1.],
[1., 1., 1.],
[0., 1., 1.]]],
[[[1., 1., 1.],
[1., 1., 1.],
[1., 0., 0.]]]]))]
prune 함수를 수행하고 나면, 레이어의 named_buffers()에 'weight_mask'라는 새로운 파라미터가 하나 생성된 것을 볼 수 있습니다.
Pytorch에서는 mask tensor를 새로 생성해서 pruning을 수행하게 됩니다.
즉, 삭제할 값을 0, 보존할 값을 1로 설정한 mask tensor를 생성하고, 실제 계산을 수행할 때 mask와 weight를 element별로 곱한 tensor를 활용합니다.
이번에는 original model의 출력값과 첫 번째 레이어(module)를 가지치기한 모델의 결과를 비교해봅시다.
값에 차이가 생긴 것을 볼 수가 있습니다.
output_pruned_conv1 = model(images[:1])

>>> print(f"original output: {output_orig}")

>>> print(f"pruned weight output: {output_pruned_conv1}")

>>> print(f"difference: {output_orig - output_pruned_conv1}")
original output: tensor([[ -7.9678, -13.6928, -20.6445, -5.8569, -13.8743, 22.2749, -2.0126,
-13.3453, -4.1711, -4.2301]], grad_fn=<AddmmBackward>)
pruned weight output: tensor([[ -8.6187, -12.7903, -18.8316, -4.4383, -12.1617, 19.8098, -3.0493,
-11.2096, -3.9549, -3.8261]], grad_fn=<AddmmBackward>)
difference: tensor([[ 0.6509, -0.9025, -1.8129, -1.4185, -1.7127, 2.4650, 1.0368, -2.1357,
-0.2162, -0.4040]], grad_fn=<SubBackward0>)
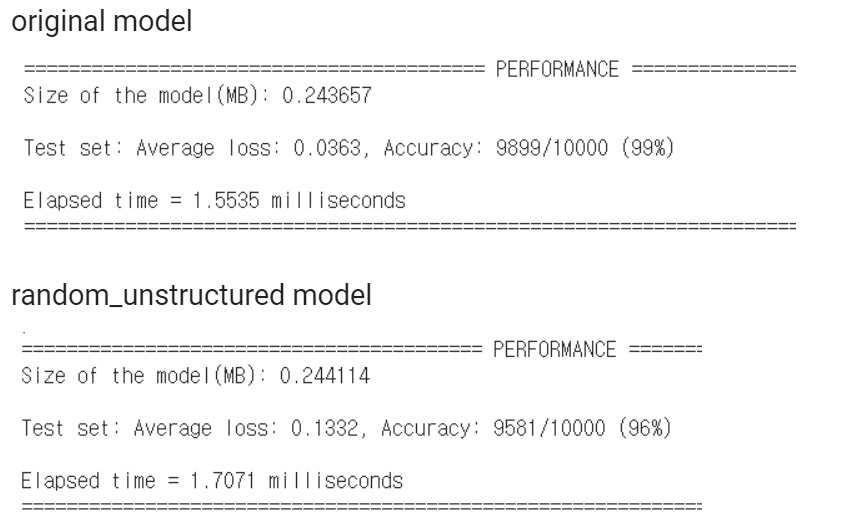
"Original model"과 "random_unstructured pruning을 적용한 model"의 차이는 다음과 같습니다.
Original model보다 Accuracy는 떨어졌고, Average loss가 오른 것을 알 수 있습니다.
(여기서 Elapsed time은 약간 늘어난 것을 볼 수 있는데 mask 계산이 추가되어 그런 것으로 짐작할 수 있습니다.)
3️⃣ L1 Unstructured Pruning => bias
이번에는 첫 번째 layer의 bias를 pruning합니다.
Random으로 값을 선택하여 pruning 한 weight와는 다르게, 값이 작은 순서대로 (L1 norm) pruning을 수행합니다.
이때, amount를 float으로 입력하면 해당 비율만큼, int로 입력할 경우 해당 개수만큼 값을 선택하여 pruning 합니다. Lowest L1-norm을 값 비교의 기준으로 삼게 됩니다.
prune.l1_unstructured(module, name="bias", amount=3)
named_parameter는 다음과 같습니다.
l1_unstructured pruning을 적용하자 'bias' -> 'bias_orig'로 바뀐 것을 알 수 있습니다.
>>> print(list(module.named_parameters()))[('weight_orig', Parameter containing:
tensor([[[[ 0.1672, -0.1517, -0.1711],
[ 0.1280, -0.1407, 0.3215],
[-0.1074, 0.2512, 0.2103]]],
[[[ 0.0602, 0.2026, 0.0181],
[ 0.1411, 0.0426, 0.1177],
[-0.0267, 0.1855, 0.0767]]],
[[[ 0.3355, 0.0562, -0.5521],
[-0.1873, 0.0618, -0.2184],
[-0.0807, 0.2019, 0.4228]]],
[[[ 0.3663, -0.0216, 0.2986],
[ 0.1475, 0.4550, 0.3350],
[-0.6378, -0.6662, -0.2658]]],
[[[ 0.2871, 0.1041, 0.2666],
[ 0.0158, 0.4709, -0.2112],
[ 0.4000, 0.0856, -0.3989]]],
[[[ 0.4908, 0.0509, 0.2348],
[-0.3349, -0.2446, -0.7014],
[-0.6735, -0.3921, -0.2518]]]], requires_grad=True)), ('bias_orig', Parameter containing:
tensor([ 0.1874, 0.0468, 0.0102, -0.1306, 0.2191, 0.4025],
requires_grad=True))]
이에 따라 named_buffers()에도 bias_mask가 생성되었습니다.
>>> print(list(module.named_buffers()))[('weight_mask', tensor([[[[0., 1., 0.],
[0., 0., 1.],
[0., 1., 1.]]],
[[[1., 1., 1.],
[1., 0., 1.],
[1., 0., 0.]]],
[[[0., 1., 0.],
[1., 0., 1.],
[1., 1., 1.]]],
[[[1., 1., 1.],
[0., 1., 1.],
[1., 1., 0.]]],
[[[1., 1., 1.],
[1., 1., 1.],
[0., 1., 1.]]],
[[[1., 1., 1.],
[1., 1., 1.],
[1., 0., 0.]]]])), ('bias_mask', tensor([1., 0., 0., 0., 1., 1.]))]
l1_unstructed pruning을 적용한 model의 performance는 다음과 같습니다.
device = 'cpu'

test(model=model, device=device, test_loader=test_loader)
LeNet(
(conv1): Conv2d(1, 6, kernel_size=(3, 3), stride=(1, 1))
(conv2): Conv2d(6, 16, kernel_size=(3, 3), stride=(1, 1))
(fc1): Linear(in_features=400, out_features=120, bias=True)
(fc2): Linear(in_features=120, out_features=84, bias=True)
(fc3): Linear(in_features=84, out_features=10, bias=True)
)
========================================= PERFORMANCE =============================================
Size of the model(MB): 0.244443
Test set: Average loss: 0.1904, Accuracy: 9385/10000 (94%)
Elapsed time = 1.7257 milliseconds
====================================================================================================
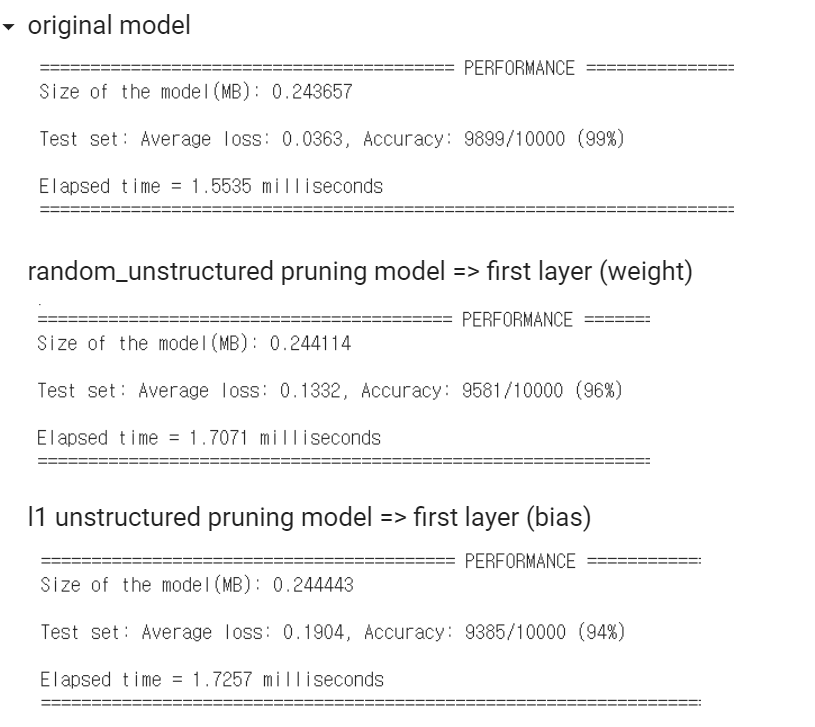
"l1 unstructured pruning model"은 "Original model"과 "random unstructured pruning model"보다
더 Accuracy는 떨어졌고, Average loss가 훨씬 오른 것을 알 수 있습니다.
(원래 Elapsed time은 떨어져야 하는 것이 맞지만 mask tensor 연산으로 인해 높아졌으며, pruning을 영구 적용하면 작아집니다.)
4️⃣ Pruning 영구 적용
Pruning을 수행한 후 더 이상 원본 파라미터가 필요하지 않을 때, pruning을 original model에 영구히 적용하는 방법을 알아봅시다.
prune.remove 함수를 사용하면, 기존의 원본 파라미터를 삭제하고 이를 prune이 적용된 weight를 교체하게 됩니다.
prune.remove(module, 'weight') # (layer, pruning 이름)
named_parameter를 확인해보면 'weight_orig' => 'weight'로 바뀐 것을 알 수 있으며, 변경된 weight값이 적용됩니다.
>>> print(list(module.named_parameters()))[('bias_orig', Parameter containing:
tensor([ 0.1874, 0.0468, 0.0102, -0.1306, 0.2191, 0.4025],
requires_grad=True)), ('weight', Parameter containing:
tensor([[[[ 0.0000, -0.1517, -0.0000],
[ 0.0000, -0.0000, 0.3215],
[-0.0000, 0.2512, 0.2103]]],
[[[ 0.0602, 0.2026, 0.0181],
[ 0.1411, 0.0000, 0.1177],
[-0.0267, 0.0000, 0.0000]]],
[[[ 0.0000, 0.0562, -0.0000],
[-0.1873, 0.0000, -0.2184],
[-0.0807, 0.2019, 0.4228]]],
[[[ 0.3663, -0.0216, 0.2986],
[ 0.0000, 0.4550, 0.3350],
[-0.6378, -0.6662, -0.0000]]],
[[[ 0.2871, 0.1041, 0.2666],
[ 0.0158, 0.4709, -0.2112],
[ 0.0000, 0.0856, -0.3989]]],
[[[ 0.4908, 0.0509, 0.2348],
[-0.3349, -0.2446, -0.7014],
[-0.6735, -0.0000, -0.0000]]]], requires_grad=True))]
또한, weight에 해당하는 mask 또한 없어진 것을 볼 수 있습니다.
>>> print(list(module.named_buffers()))[('bias_mask', tensor([1., 0., 0., 0., 1., 1.]))]
마찬가지로 bias에 해당하는 prune도 영구 적용합니다.
prune.remove(module, 'bias')
named_parameter를 확인하면 bias도 다시 'bias_orig' => 'bias'로 변경된 것을 알 수 있습니다.
>>> print(list(module.named_parameters()))[('weight', Parameter containing:
tensor([[[[ 0.0000, -0.1517, -0.0000],
[ 0.0000, -0.0000, 0.3215],
[-0.0000, 0.2512, 0.2103]]],
[[[ 0.0602, 0.2026, 0.0181],
[ 0.1411, 0.0000, 0.1177],
[-0.0267, 0.0000, 0.0000]]],
[[[ 0.0000, 0.0562, -0.0000],
[-0.1873, 0.0000, -0.2184],
[-0.0807, 0.2019, 0.4228]]],
[[[ 0.3663, -0.0216, 0.2986],
[ 0.0000, 0.4550, 0.3350],
[-0.6378, -0.6662, -0.0000]]],
[[[ 0.2871, 0.1041, 0.2666],
[ 0.0158, 0.4709, -0.2112],
[ 0.0000, 0.0856, -0.3989]]],
[[[ 0.4908, 0.0509, 0.2348],
[-0.3349, -0.2446, -0.7014],
[-0.6735, -0.0000, -0.0000]]]], requires_grad=True)), ('bias', Parameter containing:
tensor([0.1874, 0.0000, 0.0000, -0.0000, 0.2191, 0.4025], requires_grad=True))]
더 이상 named_buffer에는 아무 값도 남아있지 않게 됩니다.
>>> print(list(module.named_buffers()))[]'부스트캠프 AI 테크 U stage > 실습' 카테고리의 다른 글
| [39-3] Teacher-Student Network using PyTorch (0) | 2021.03.19 |
|---|---|
| [39-2] Quantization using PyTorch (0) | 2021.03.18 |
| [38-2] Python 병렬 Processing (0) | 2021.03.17 |
| [37-2] PyTorch profiler (0) | 2021.03.17 |
| [36-1] Model Conversion (0) | 2021.03.16 |


